If you ride regularly, you’ll be aware that bike components need to be well maintained to ensure you get the most out of your ride and bike. Bike Maintenance is a broad topic and can become very complicated when you start talking about your bike’s technical areas.
If your bike starts to make a noise that isn’t usually there, then it’s time to investigate what that is. Leaving noises on your bike typically leads to either a failure or parts to wear out quicker. Both can become expensive, depending on the part.
Follow these basic bike maintenance steps and get your bike serviced once a year by a trusted bicycle mechanic; you should enjoy trouble free riding.
Ensure your bike is cleaned regularly
How often you clean your bike will depend on how often you ride. When I commuted to work weekly on a bike, I would clean it once a week over the weekend. This helped to keep the corrosion at bay, especially in winter, where they use salt on the roads.
I would take my time washing the bike as this gave me a chance to inspect everything and make a mental note to come back to anything I thought needed a closer inspection. Removing the dirt and grime from the roads should be straightforward. Start with degreasing and cleaning the chain as this will prevent you from getting covered in oil when you wash the frame.
Using the right tools to remove the dirt and grease is essential. Specialist brushes should be used to get in between the gears and remove the dirt. This helps to reduce wear.
A good cleaning kit should consist of:
- Clean washing cloth or mitten
- Various cleaning brushes
- Chain cleaner and degreaser
- Bike cleaner and degreaser
- Drying chamois
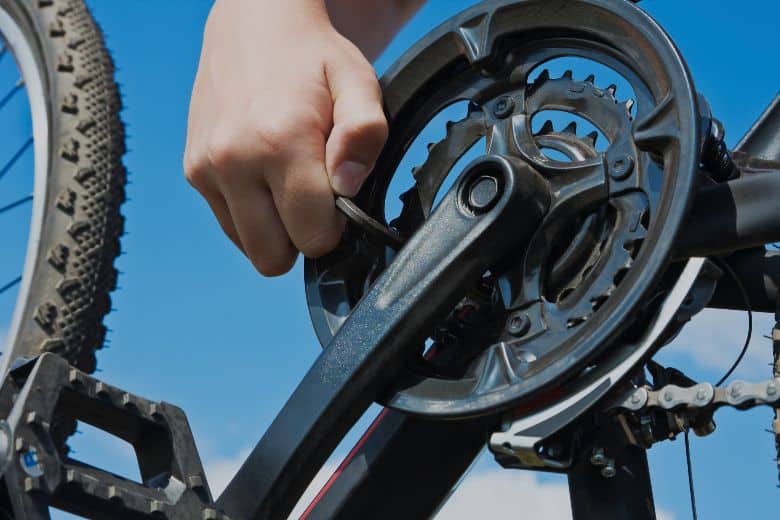
keep the drivetrain clean and well lubricated

The drivetrain (front chainrings, rear cassette, rear derailleur, and chain) is arguably the most critical part of your bike. Keeping them clean and well lubricated will help to prevent wear and prolong the life of the components.
If you’re starting out with an excessively dirty chain, I would recommend picking up a chain cleaner like the Park tool chain cleaner. If you’ve stayed on top of the cleaning, then a clean rag with some degreaser will be ok to clean off the dirt from a ride before you relubricate it.
Check the front chainrings and rear cassette for dirt in between the rings. Remove any dirt found using a brush or cassette cleaning tool by turning the pedals to ensure you get the whole circumference clean.
Your derailleur has many moving parts, ensuring that this works at the optimum you need to ensure that these are all clean, lubricated, and free of dirt.
Applying the right lubrication is a must as not all lubricants are designed to be used in the same environment. Make sure you choose the one that’s best suited for your riding conditions.
Keeping the Pressure up
Having the right tires for your ride is important to ensure that you have the right grip and comfort level when riding. Put the wrong pressure into a tire, and this will affect how the bike handles.
The tire manufacturers want to ensure you get the most out of the tires you buy. Having them perform in an optimum way with the correct pressure ensures you get the maximum from them.
An overinflated tire wears the tread down in the middle a lot faster, leading to a loss of grip on a hill or just going down the road. Conversely, an underinflated tire will wear the sides down quicker, leading to a loss of grip on a corner. Put the right amount of pressure in, and you should be able to corner with confidence.
Checking the tires for pressure before every ride is one thing; while washing the bike, look for cuts that go through the rubber to the tire’s carcass. If you have a cut like this, then replace it. It’ll only be a matter of time before it either blows out or worse, ruptures while you’re out riding.
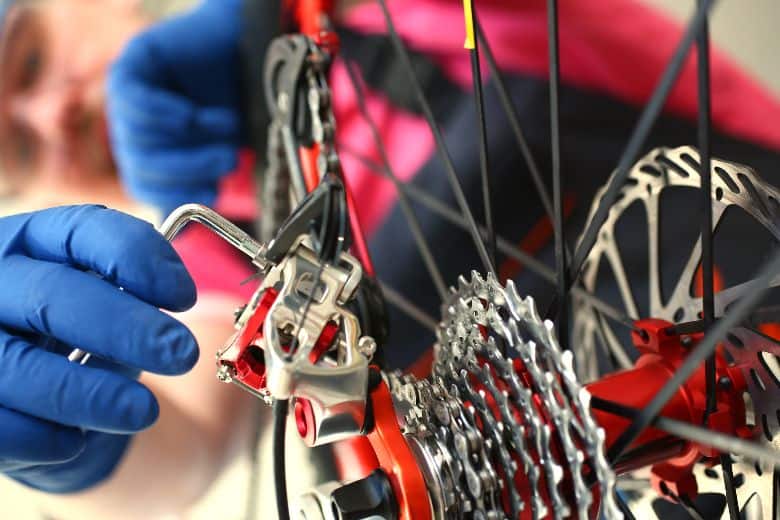
Ensure everything is tightened.
Over time vibration from riding on uneven surfaces may cause the nuts, bolts, and screws to come loose on your bike. There are several ways we can help ourselves with this problem.
The first is to use Loctite threadlocker 242. This’ll ensure that your nuts, bolts, and screws won’t come undone. Using this product means that you’ll not need to check to see if anything has moved as it’ll hold it in place.
The second, requires you to set up a regular bicycle maintenance schedule to check that they’re still tight using a torque wrench. Buying a good torque wrench is a must if you plan on doing any bicycle maintenance yourself.
You’ll also need to check for bearing movement and that the retainers haven’t worked loose. The main bearings are the head bearing and the crank bearing.
To check the head bearings, stand astride your bike and pull the front brake. Now try to rock the bike back and forth to see if you have movement (there should be none). If you have, check to see if the retaining nut has come loose and if not then it’s time to replace the bearing.
Checking the crank bearing, hold the pedal at the bottom of the rotation and then push and pull from side to side of the bike. If it moves in this direction, check the bearing retainer. Otherwise, you’ll need to get the bearing replaced.
Make sure you can stop
Having good brakes on a bike is paramount for your safety and also to those around you. Checking them before a ride is a must. The first thing to check is the wear line.
If you’re near it, order a new set now and store them until you reach the line. Better to have them and not use them than not to have them and need them.
Check the brakes for contamination in the block or pad. It’s common to get embedded dirt and grime; this will affect your stopping power. Scrape the dirt and grime out.
Check that when you pull your break that the whole pad is touching. Pads wear down, cables can stretch, checking that your pads touch is one way to find out if you need to adjust them.
If they squeak when applied, don’t be tempted to use WD40 on them. Please don’t lubricate the brake pads or blocks in any way. Lubricating a brake pad or block means you won’t have any brakes on your bike.
The squeaking means that the rubber or pad has gone hard. Just replace them.
Selecting the right Gear
If you are following these guides, then you should’ve lubricated the gears and chain. This will help to give a smoother transition of the gears you select.
Check the gear teeth regularly for wear; these should have sharp edges. If they’ve been rounded over, it’s time to look at replacing them. If you replace your rear cassette and front chainring, also replace your chain.
Check the wear on the derailleur wheels and replace them as needed. If you replace any part on the drivetrain, you’ll have to go through setting up the gear selection process.
Check the gear cable for wear; these are prone to stretching and breaking if not looked after. If you’ve reached the limit of adjustment on the cable and have difficulty selecting a gear, it’s time to replace the cable.
Replace worn-out components
There are a lot of components on a bike that will wear over time, and while some have indicators on them like the brake pads, others don’t. If you do some basic bicycle maintenance, it should be easy to see if something needs replacing or repairing.
The one thing I’ll always do upon seeing an issue or if a part is getting near to the worn limit, is to replace sooner rather than later. This typically stops me from having to pay out a lot of money because I neglected the signs.
